
Tutorial 5: Record animated USD Stage from FlexSim Model
Duration: 30 minutes
Target group: Advanced users
(experienced with NVidia Omniverse connection to FlexSim)
Goal: At the current release state 2024.2.2, FlexSim does not provide a tool to export an animated USD stage of a model. There is a way around though by recording the FlexSim model connected to a NVidia Omniverse live session using one of the tools in NVidia’s USD Composer, the Animation Stage Recorder.
This is a step-by-step tutorial to guide you through the process. It is assumed, when you are interested in this you already know how to connect FlexSim to a live session in NVidia Omniverse.
Dauer: 30 Minuten
Geeignet für: Fortgeschrittene
(Vertraut mit NVidia Omniverse Verbindung zu FlexSim)
Ziel: In der aktuell veröffentlichten FlexSim Version 2024.2.2 wird kein Werkzeug bereitgestellt, um eine animierte USD Stage eines Modells zu exportieren. Es gibt jedoch einen Weg, das Problem zu umgehen. Hierzu wird das FlexSim Modell mit Hilfe eines Werkzeuges im Nvidia Omniverse USD Composer, dem Animation Stage Recorder, in einer Nvidia Omniverse Live Session aufgenommen.
Dieses Tutorial wird Sie Schritt für Schritt durch diesen Prozess zu führen. Wir gehen davon aus, dass Sie bereits wissen, wie Sie FlexSim mit einer Nvidia Omniverse Live Session verbinden.
![]()
For more information about NVidia’s Omniverse, visit the official NVidia website or read the FlexSim blog post about the integration of NVidia Omniverse in FlexSim.
Besuchen Sie die offizielle Webseite von NVidia um mehr über NVidias Omniverse zu erfahren oder lesen Sie den FlexSim blog post über die Integration von NVidia Omniverse in FlexSim.
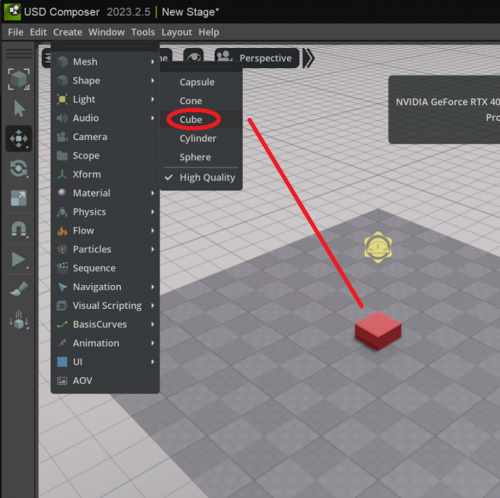
- Start the USD Composer and create a simple stage
(you can start with the FlexSim stage as well, but adding this step makes it simple to obtain the path to the stage)
-
Starten Sie den USD Composer und erstellen Sie eine einfache Stage
(Sie können auch mit dem FlexSim USD Stage-Objekt beginnen, aber dieser zusätzliche Schritt vereinfacht es, den Dateipfad zur USD Stage zu kopieren)
-
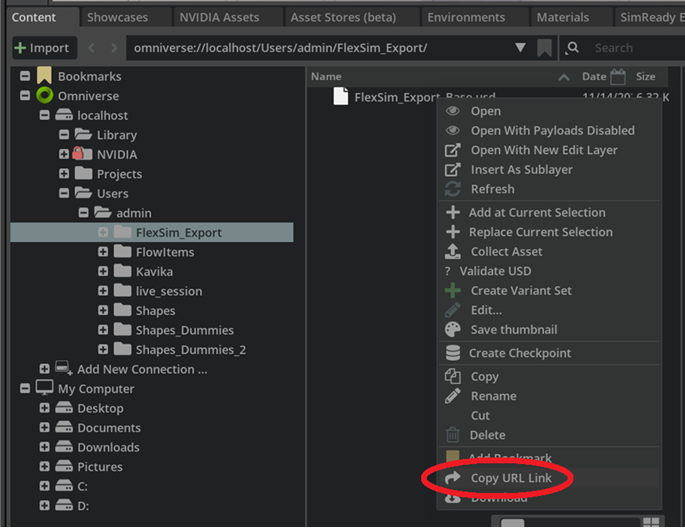
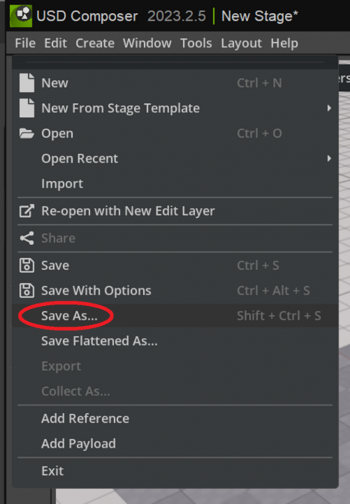
Save the stage and right click to copy the path to the saved stage
-
Speichern Sie die Stage, klicken Sie mit der rechten Maustaste darauf und kopieren Sie den Pfad zur gespeicherten Stage, indem Sie Copy URL Link auswählen
- Start FlexSim and load or build a model.
- Starten Sie FlexSim und öffnen Sie ein vorhandenes Modell oder erstellen Sie ein neues.
-
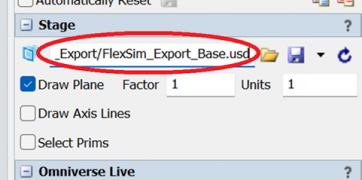
Connect the USD Stage object in FlexSim to saved USD stage by pasting copied path into property and click into blank background
-
Verbinden Sie das USD Stage-Objekt in FlexSim mit der gespeicherten USD Stage, indem Sie den kopierten Pfad in die Properties einfügen. Klicken Sie danach in den leeren Hintergrund des Stage GUI.
-
Save the USD Stage from the FlexSim USD Stage object to update saved file
-
Speichern Sie die USD Stage aus dem FlexSim USD Stage-Objekt, um die gespeicherte Datei zu aktualisieren.

-
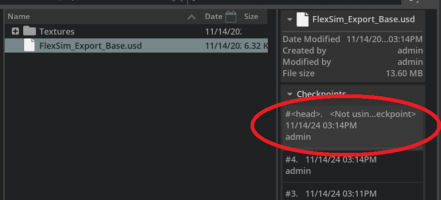
If the USD Composer does not prompt to fetch the update, manually force an update by either double clicking the last checkpoint for the stage or open a new stage and load the saved one
-
Sollte der USD Composer nicht automatisch das Fenster zum Update der Stage anzeigen, forcieren Sie das Update durch einen Doppelklick auf den letzten Checkpoint der Stage oder öffnen Sie eine neue Stage und laden Sie die gespeicherte.
-
Enter a live session name in FlexSim’s USD Stage object property and start a live session
-
Vergeben Sie einen Namen für die Live Session in den FlexSim USD Stage-Objekt Properties und starten Sie diese.

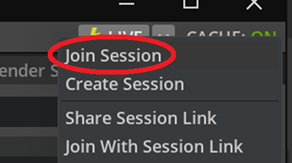
- Connect to the live session in the USD Composer.
- Verbinden Sie sich im USD Composer mit der Live Session.
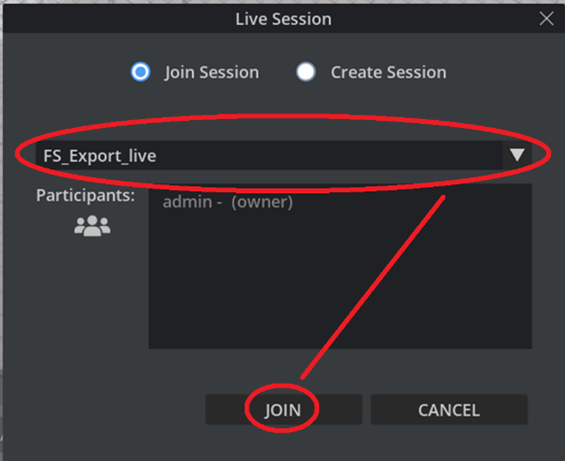
- Running the model in FlexSim synchronizes the USD Composer view.
- Das laufende Simulationsmodell in FlexSim wird nun mit der USD Composer Ansicht synchronisiert.
- Run the model in FlexSim up to the point where you want to start recording the animation
- Lassen Sie das Modell in FlexSim bis zum Zeitpunkt laufen, an dem Ihre Aufnahme beginnen soll.
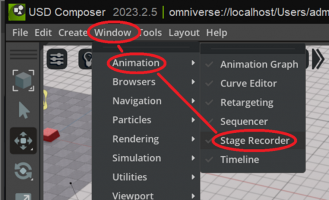
- Open the Stage Animation Recorder in the USD Composer.
- Öffnen Sie den Stage Animation Recorder im USD Composer.
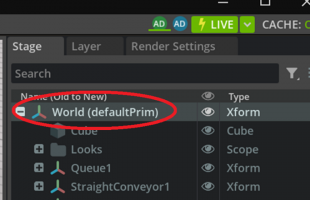
- Select the prim you want to record the animation from in the Stage tab. This is in general the one holding the animated objects in the model.
- Wählen Sie per Mausklick das Prim aus, das Sie aufzeichnen möchten. Im Regelfall handelt es sich dabei um das die zu animierenden Objekte des Modells beinhaltetende Prim.
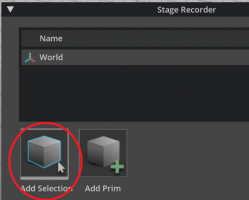
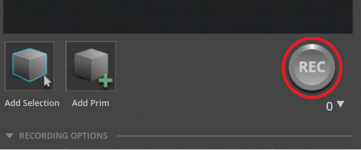
- Add Selection to the Stage Recorder
- Klicken Sie auf Add Selection.
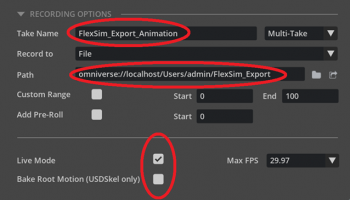
- Select the track name, export the location and make the changes to record the animation from a live session.
- Wählen Sie einen Namen für die Aufnahme sowie den Verzeichnispfad der Datei aus. Setzen Sie das Flag zur Aufnahme einer Live Session Live Mode.
-
Run the model in FlexSim and start to record in USD Composer
-
Lassen Sie das Modell in FlexSim laufen und starten Sie dann die Aufnahme im USD Composer durch einen Klick auf den REC Button.
- Click Record again to stop the recording.
- Drücken Sie erneut auf den REC Button, um die Aufnahme zu stoppen.
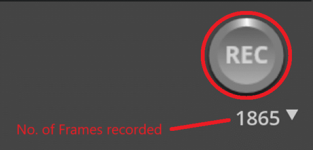
The result is a recording of the animation only!
Das Ergebnis ist eine Aufnahme, welche ausschließlich die Animationsdaten enthält.

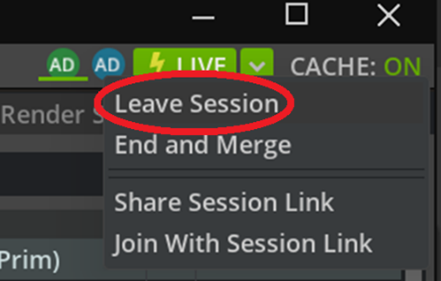
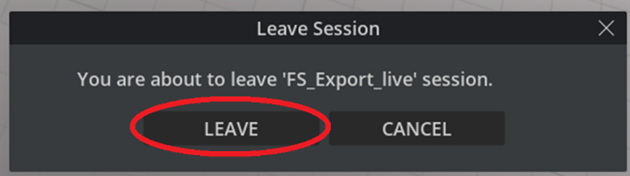
- Disconnect the USD Composer from the live session and click on LEAVE to confirm.
-
Trennen Sie den USD Composer von der Live Session und bestätigen Sie dieses.
In the next steps we will combine the two stages, the base stage containing the objects and the recorded stage containing the animation into one stage.
In den nächsten Schritten kombinieren Sie die beiden Stages, die mit den Modellobjekten und deren Informationen und die aufgenommene mit den Animationsdaten.
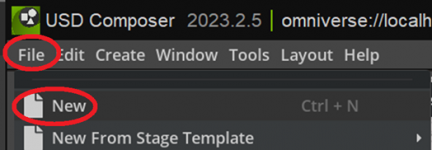
- Create a new blank stage in USD Composer without saving the old one.
- Erstellen Sie eine neue, leere Stage im USD Composer ohne die alte zu speichern.
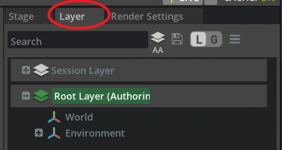
- Change from the Stage tab inside the USD Composer's tree view to the Layer tab.
- Wechseln Sie in der Baum-Ansicht des USD Composers vom Stage-Reiter zum Layer-Reiter.
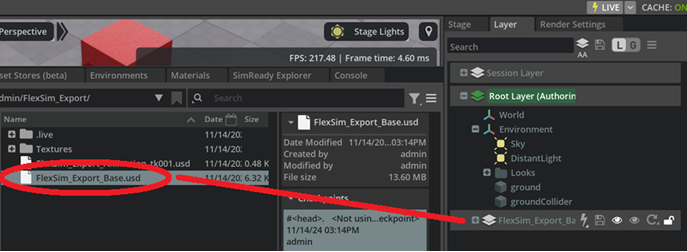
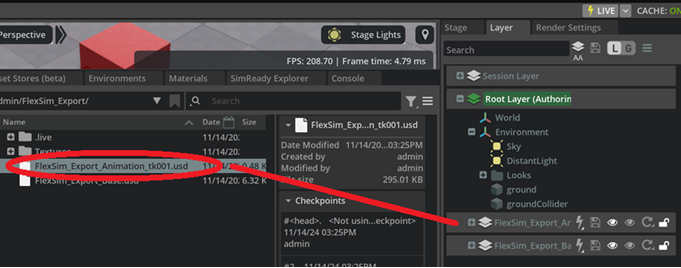
- Drag the original containing stage from the content browser into the Layer tab.
- Ziehen Sie die ursprüngliche, die Objekte beinhaltende Stage vom Content Browser in den Layer-Reiter.
- Repeat the last step with the recorded animation stage.
- Ziehen Sie nun auch die Stage mit den Animationsinformationen in den Layer Tab
Notice that the newly dragged animation stage is put above the original object stage. The order matters, don’t do it the other way round.
Beachten Sie, dass die als zweites in den Layer-Reiter gezogene Animations-Stage hierarchisch oberhalb der ursprünglichen Objekt-Stage angezeigt wird. Die Reihenfolge ist relevant.
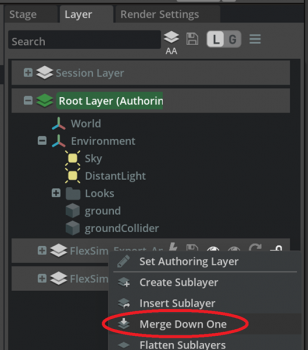
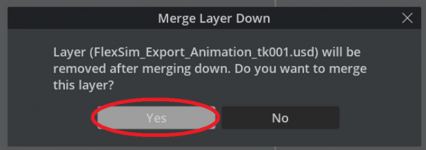
- Right click into the animation stage and select Merge Down One to merge the animation stage into the original object stage and confirm. That adds the animation information directly into that stage to the corresponding objects
- Klicken Sie mit der rechten Maustaste auf die Animations-Stage und wählen Sie Merge Down One aus, um die Animations-Stage mit der ursprünglichen Objekt-Stage zusammenzuführen. Bestätigen Sie die Aktion.
So werden die Animationsinformationen der Objekt-Stage hinzugefügt.
You might want to open the timeline GUI at “Windows/Animation/Time Line” and check, if the recording went well before saving it off.
Öffnen Sie das Zeitleisten-GUI über „Windows/Animation/Time Line“ und prüfen Sie, ob die Aufnahme geklappt hat bevor Sie das Ergebnis speichern.
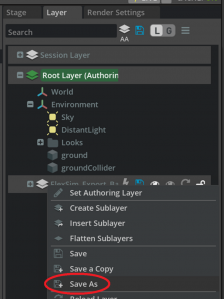
- Right click into the remaining original stage layer and select “Save As”
- Klicken Sie mit der rechten Maustaste auf den verbliebenen ursprünglichen Stage-Layer und wählen Sie Save As aus.

The saved USD stage contains the full animated stage without references to external files now and can be used in any USD compatible tool, e.g. USD Explorer.
Die gespeicherte USD Stage beinhaltet nun die vollständige, animierte Stage ohne Referenzen zu externen Dateien und kann in jedem Tool, das USD unterstützt, benutzt werden wie beispielsweise im USD Explorer.
Conclusion
Fazit
Congratulations, you made it!
This might not be the best or simplest way to get here, but this works.
Authors: R. Gruber
Gratulation, Sie haben es geschafft!
Dies ist vielleicht nicht der beste oder einfachste Weg, aber er funktioniert.
Autoren: R. Gruber